Limited Data? Improve your Dataset with our No Code Data Augmentation tool, KIADAM
- Rémi Coscoy

- Jul 10, 2023
- 5 min read
Updated: Aug 29, 2023
Quantity of data is essential to the quality of the prediction your model will output.
Let's say you are doing or planning to do a computer vision project, with object recognition and deep learning.
What can you do when you have a low quantity of data, and don't have enough time or money to gather more, or figure out a code based solution?
Our Kiadam tool can allow you to surmount this problem by using an innovative Data Synthesis technique combining the latest of Data Augmentation with an innovative image generation process.
Its no code interface will save you precious time, and it will overall help you massively improve your metrics.
Here are some links to the different parts of this article
What is this "Data Synthesis" and why does it work?
Let us take a look at Ultralytic's Tips for Best Training Results. The recommendations for the dataset include :
Image Quantity. About 1500 Images and 10 000 Instances per class
Image Variety. Variations representative of deployed environment. Includes variation in settings, lighting, image quality, color...
Label Consistency. No unlabeled images
Label Accuracy. Bounding box accurately encloses the object
Label verification. Making sure labels are correctly put
Background Images. Between 1% and 10% of Images with no object to reduce False Positive
Gathering thousands of varied images as well as labeling them is extremely time consuming, and certainly not a one person job.
But what if we told you Kiadam allowed you to comply with all these requirements on your own?
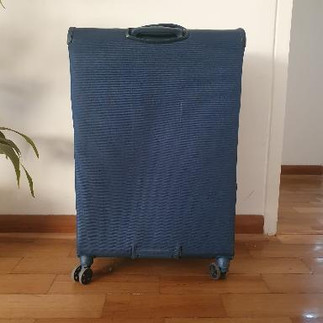
The idea is the following. Let's say you need to train a model to recognize a specific object. In this article, we will use suitcases.
You will need to take pictures of the suitcases, and crop them so that only the suitcase appears and not the background:


Then, take pictures of all the places your suitcases are likely to appear in your deployed environment. We simulated this with various rooms of the same apartment

We then create images by pasting the photos of your objects onto these backgrounds. There also a wide array of data augmentation techniques to your disposition, to create images that are as close to what you will encounter in production as possible


You only need to label the "object" images, the bounding box will then be created automatically.
Looking back at the recommendations :
Image Quantity. Once you have the object and background images, you can create virtually as many images as you want at no additional cost
Image Variety. You can set a large number of backgrounds, which in addition to the large number of Data Augmentation techniques allow you to create a highly varied Dataset. See how to choose the backgrounds here
Label Consistency. The label and bounding box are added automatically. It is impossible for an object to be unlabeled or mislabeled, provided the original labels are correct
Label Accuracy. Provided the initial crop is done adequately, you can effortlessly have near perfect label accuracy on all of your images
Label verification. Can be verified the same as any training set
Background Images. Added by default in our tool
Let’s see in more details how this new kind of dataset compares to the traditional approach
See just how important changing up the background is here
Creating our real world datasets
Throughout this experiment, we will work with pictures of four different suitcases taken in several rooms within the same apartment.
Our goal is to simulate a situation where only a small number of pictures are available for training while real world constraints for testing still exist.
To achieve this, our training set will consist of 5 pictures of each suitcase, in the same neutral environment.


In contrast, our testing set will include pictures of the suitcases in varying environments, lighting conditions, size and number.


Those images were then labeled using Roboflow
Setting up
Follow along with our Google Colab Notebook (~2h)
Follow along by opening our Google Colab file and making sure to select a GPU runtime in the top right menu.
You can then install the required dependencies and clone into Ultralytics' distribution of YoloV5 as well as install the requirements
import os
import zipfile
import yaml
if not os.path.exists("/content/yolov5"):
  !git clone https://github.com/ultralytics/yolov5
  !pip install -r /content/yolov5/requirements.txt
Importing the datasets
We uploaded the datasets in our Google Drive.
To download them into the Colab notebook and unzip them, run the following code :
suitcase_folder_path = "/content/SUITCASE_DATASETS"
suitcase_compressed_path = "/content/SUITCASE_DATASETS_COMPRESSED.zip"
if not os.path.exists(suitcase_compressed_path):
  !gdown 1Wk94TJIS2GxCA9UwuD_EiXkSJ28gpRK0

if not os.path.exists(suitcase_folder_path):
  with zipfile.ZipFile(suitcase_compressed_path, 'r') as zip_ref:
            zip_ref.extractall("/content/")
We also have to rewrite the yaml files, given that the training and testing sets are in two different directories.
Training and testing with YoloV5
Ultralytics' distribution makes this section short and easy. To train, run this cell
(do not hesitate to adjust the number of epochs)
!python /content/yolov5/train.py \
  --weights yolov5s.pt \
  --data /content/SUITCASE_DATASETS/training_set_simple/data.yaml \
  --name simple_training \
  --epochs 150
And run this one for the testing
!python /content/yolov5/val.py \
  --task test \
  --data /content/SUITCASE_DATASETS/training_set_simple/data.yaml   \
  --weights /content/yolov5/runs/train/simple_training/weights/best.pt
First Results
To ensure a fair comparison we will use the mean Average Precision or mAP metric obtained while testing on the aforementioned real world dataset.
Our point of comparison will be the precision of YoloV5 trained on the COCO (Common Objects in COntext) dataset, which contains the "suitcase" class. We obtain in this first test an mAP of 0.797
When training with our limited data (with the COCO pre-trained model as starting point) the results are quite disappointing, with an mAP of 0.712, lower than without the additional training
Dataset | mAP (mean Average Precision) |
COCO | 0.797 |
Simple | 0.712 |
Normally this would be the end of the road and we would have to either make do with this level of precision or increase the size and quality of our training dataset, which can be costly or downright impossible in some cases.
However, using Kiadam we can create brand new training images from our insufficient training dataset.
Generating a "synthesized" Dataset
Follow our detailed tutorial here
To get started head out to the tool page and log in. Then follow these steps and don't hesitate to click on the link for more details.
Here are some images representative of what you'll be able to generate


Final Results
When training with this synthesized dataset, we obtain a mAP of 0.887!
Here are a compilation of the results:
Dataset | mAP (mean Average Precision) |
0.797 | |
Simple | 0.712 |
Synthesized | 0.887 |